Chinese Fonts
制图软件 Graphics Software
Click on any word to see more details.
There are two high level goals that you might have in font design that will lead to different choices in software. Firstly, you may be looking to create a graphic image with text in it. For example, a business card with some calligraphic style text or a company logo with unique text. For this goal a graphics editor will be needed. Graphics editors fall into two main categories: bitmap editor and vector editors.
Readers will probably be most familiar with bitmap editors. Examples of bitmap editors are Adobe Photoshop and the open source GNU Image Manipulation Project [GIMP] editor. They cannot be used to do much with font design but they can be used to write text with any number of fonts that you might find on the web (see Getting and Using Chinese Fonts) and create a graphic image, say for a web site banner. You can also perform some bitmap transformations on the text to make it more interesting. Adobe Photoshop is the market leading bitmap graphics editor. It also includes some basic vector graphics editing capabilities. Photoshop comes in two flavors: a professional edition and Photoshop Elements, for the less serious amateur, at a more reasonable price. See [Adobe 2010] for more details.
With vector graphics editor you can manipulate the graph elements of fonts at a lower level. You can edit the spacing, or kerning, between the characters, change the text outline, and perform vector transformations to make the text more interesting. You can also create your own characters by drawing or tracing them. This is what we would call font design. I will talk about tracing of historic scripts at some length in this article. Having done that you could either export the picture to a graphics format, such as png, viewable by users or you could export the vector file to a font editor, such as FontForge. Examples of vector graphics editors are Adobe Illustrator and the open source Inkscape editor [Inkscape]. I will cover Inkscape in more detail here than other tools because it is free, open source and very useful. However, I will also mention Adobe Illustrator (AI) very briefly. Adobe Illustrator is a commercial vector graphics editor and considered the market leader in this field. It is part of the Adobe Creative Suite. The first release of Adobe Illustrator was in the late 1980s. There are many third party plug-ins for Illustrator that add on all kinds of capabilities.
Initially, Illustrator used PostScript as its native file format but later created a variant, the AI format.
Inkscape
Inkscape is a free, open source SVG based vector graphics editor. It can be used to create two dimensional line drawings, charts, scientific illustrations, icons, logos, cartoons, etc. It is very useful for creating text by free hand drawing or tracing. Inkscape has useful tools like calligraphic pen, pencil, freehand shapes, bucket fill tool, etc to create vector based drawings. The drawing can then be exported to any format needed. Editing can also be automated in Inkscape with scripting so that if you have a large number of files, like a set of characters, they can be processed in a batch quickly.
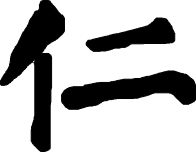
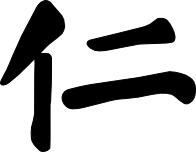
Inkscape is a very easy package to learn to use. An example of what you might do with Inkscape is to import a bitmap of a historic calligraphic work, trace it, and then delete the original. This is what I did with the figure below, traced from a work by the well known Tang Dynasty calligrapher Yan Zhenqing, with less that an hour learning the application.


To trace the ren character I used the pencil tool in the Inkscape toolbox controlled with my mouse . I will discuss correcting the jagged edges below.
Inkscape also has an XML editor that allows you to read and edit the SVG XML document representing the image. If you select an XML element in the XML editor the corresponding element will be highlighted in the graphical editor. You can also add metadata, such as the name and description of elements, in the graphical editor that can allow easy identification and description in the XML editor. If something is supported by the SVG standard but not by the Inkscape graphical editor, you can add it directly to the SVG text.
Transforming shapes precisely is important in creating text and also in line drawings. Inkscape has advanced features for accurately transforming objects, including keyboard shortcuts. These include
- Moving objects vertically or horizontally using CTRL-drag with the selector tool, in precise increments with the arrow shortcut keys → ← ↑ ↓, or with numeric amounts.
- Resizing objects while maintaining the aspect ratio using CTRL-drag with the selector handles, in precise increments with the angle brackets shortcut keys < >, or with numeric values.
- Rotating objects in specific angular increments using CRTL-drag or with the shortcut keys [ ] while in rotate mode
- Skewing objects with numeric values using the transform dialog
- Performing a matrix transformation with the transform dialog
The increments and other properties of all these transformations can be controlled with preferences to suit the particular project being worked on. To help you get points located exactly the way you need them Inkscape also has a tweak tool that can tweak things with many different effects. For example, in the ren character above that I traced from Yan Zhenqing's inscription, has quite jagged edges. This is because tracing with a mouse, which is how I did it, is very difficult.


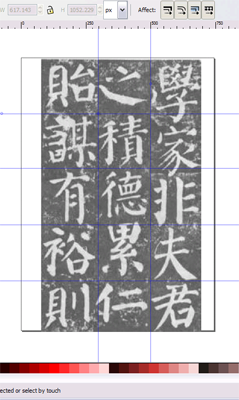
You can a guidelines to drawings using Inkscape. These do not show up in images exported but are very useful in creating characters in standard sizes and with the right symmetry. Guides can be horizontal, vertical, or diagonal. For example, the screen shot below shows guidelines that I created to aid in tracing this steele by Yan Zhengqi.

After some practice tracing characters with Inkscape I arrived at the optimal procedure for me:
- Trace the stroke with the pen tool, clicking on strategic points to create nodes along the outline. This results in a straight sided polygon.
- Change to the node tool, type CTRL-A to select all nodes, and in the node toolbar click 'make selected nodes autosmooth.' This converts the to straight line segments to Bezier curves and will result in a rounded outline with many nodes.
- Click CRTL-L to simplify the path. Delete any nodes that are not needed with the DEL key. The outline will be somewhat too rounded at this point
- Manually tweak the Bezier curves to tighten up the shape.
- Use CTRL-SHIFT and click to select all the strokes in the character. Type CTRL-G to group the strokes into a character
- In the Fill and Stroke dialog fill the entire character with black fill.
Don't forget to appreciate the artistry of the work that you are tracing.
Inkscape supports filling in shapes with flat colors, gradients, and patterns and also allows the transparency of shapes to be set. It supports RGB, CMYK, and HSL color models. However, Inkscape is not very suitable for printing because of limitations in SVG. CYMK, which is best for printing, is converted to RGB by Inkscape. Inkscape includes many different palettes, such as the web safe palette used for the Windows user interface, and allows users to create their own palettes. The Inkscape palette definition file is interoperable with GIMP.
Inkscape supports a wide variety of color gradients. Gradients can be linear, that is, varying over the length of a line; elliptical, that is, radiating outward from a point; multistage, that is, vary of the length of a composite line; or repeated.
Inkscape has extensive capabilities for creating and manipulating paths. Inkscape allows you to convert objects to paths. For example, you can write text with the text tool and then convert that text to a path allowing you to manipulate the individual pieces of the characters. This is what I have done in the image below. After converting the ni 你 character to path, I left the left person radical solid and changed the right part of the character to outline only.
Inkscape supports combining paths by creating the union, difference, intersection, and exclusion of two or more paths. The figures below show the union of two paths. The left figure shows the two paths before union and the right figure shows the combined path after th union.
The difference operation can be useful for holes contained within closed paths. The Simplify path operation redraws the path with fewer nodes, ironing out small details but preserving large-scale features and the overall shape. This can be a very useful tool to clean up paths traced from scanned images, such as caligraphic text. You can trace the scanned calligraphy with the node tool or pencil tool, simplify the path, and then manually move any nodes or curves to fit the original cleanly.
In Inkscape you can enter characters using Unicode codes in text mode by typing CTRL-U and then the Unicode number.
When using Inkscape to create Chinese fonts there are a few practical points that may help you:
-
Set the document size to 1,000 x 1,000 pixes
This is needed for importing to SVG file into FontForge as a glyph
-
Trace the individual strokes of the character you are tracing
Tracing characters is time consuming and this will help you make use of the time spent to also learn characters. There are a limited number of characters available for tracing and you will be able to manipulate the individual strokes more easily than an outline of the entire character.
-
Combine the individual stroke outline paths with Path | Union
This is required in FontForge because intersecting paths will lead to holes in the characters.
-
Do as much graphic work as possible in Inkscape before importing into FontForge
Inkscape is a more powerful graphic tool than FontForge, especially in path manipulation
To illustrate point 2 above consider the you character 由 shown below created by extending central vertical stroke of a traced tian character 田. With the entire outline of the character this would be difficult but with individual stroke outlines it is simple.


For more information on Inkscape see [Kirsanov] and [Inkscape].
Dictionary cache status: not loaded